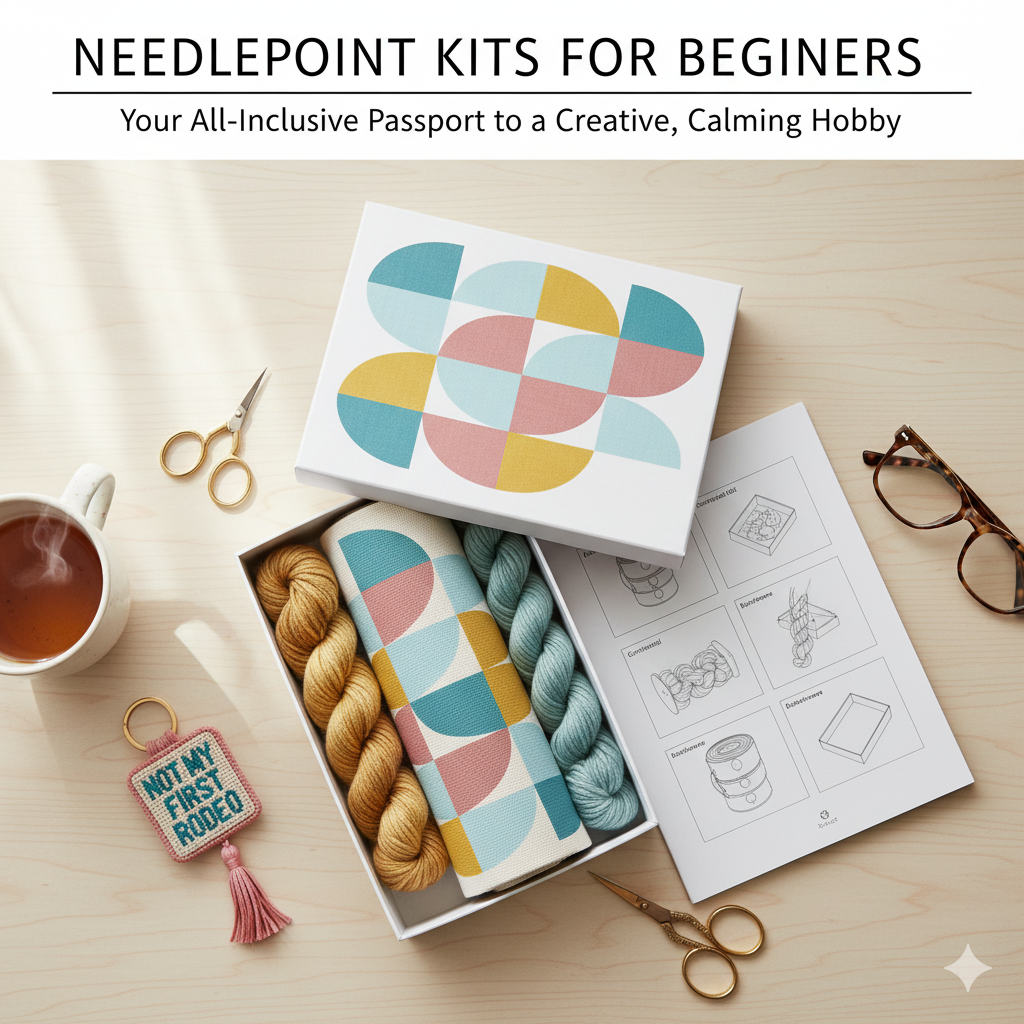
Needlepoint. The word alone conjures images of cozy afternoons, the rhythmic pull of thread through canvas, and the satisfaction of watching a vibrant pattern emerge beneath your fingers. Once considered a dusty, old-fashioned hobby, needlepoint is experiencing a massive, vibrant resurgence, transforming from traditional samplers into witty, colorful, and highly covetable pieces of modern art and home decor. Needlepoint Kits For Beginners
If you’ve been searching for a craft that is meditative, portable, and requires no complicated machinery, needlepoint is your answer. And the key to unlocking this satisfying hobby? The beginner needlepoint kit.
Forget the overwhelming process of selecting canvas mesh, finding the correct thread count, and deciphering cryptic patterns. A well-chosen beginner kit is your all-inclusive passport into this delightful world, designed to take out all the guesswork and leave you with nothing but the joy of stitching.
This guide will walk you through exactly what makes a needlepoint kit perfect for a novice, the essential components to look for, the first stitches you’ll master, and how to choose a project that will spark not just creativity, but true passion.
The Magic of the Kit: Why Start Here?
The single biggest barrier to starting any new craft is often the initial setup. Where do you even begin? Needlepoint, in particular, has specialized components that can confuse a newcomer. This is where the beginner kit becomes your best friend.
A needlepoint kit is essentially a curated crafting experience. It ensures that every single piece of the puzzle—from the size of the needle to the weight of the thread—is perfectly matched and ready to go.Needlepoint Kits For Beginners
What’s Inside the Perfect Beginner Box?
A truly excellent starter kit should include the following core components, making it a grab-and-go project:
The Canvas (Your Map):
This is the foundation, a stiff mesh fabric upon which you stitch. For beginners, the canvas is typically pre-printed, meaning the design is already painted or printed directly onto the mesh. This is like a “coloring book with thread” and eliminates the need to constantly look at a separate chart. This feature is non-negotiable for a first-time stitcher.
The Mesh Count (Your Clarity):
Canvas mesh is measured by “count,” or the number of threads per inch. A higher count means smaller, finer holes and tinier stitches (and a much longer project). For beginners, look for a 10-mesh or 13-mesh canvas. These counts offer large, easy-to-see holes that are kind to the eyes and ideal for learning basic technique.
The Threads (Your Paint):
A kit will include all the yarn or floss colors needed, often pre-cut into manageable lengths. Wool is a thick, classic, and easy-to-handle fiber, making it a favorite for beginners as it provides excellent coverage. Wool blends or durable cotton flosses are also common and excellent choices.
The Tapestry Needle (Your Tool):
Needlepoint requires a specific type of needle—a tapestry needle—which has a blunt, rounded tip (so it slips between the canvas threads instead of piercing them) and a large eye for easy threading. A good kit will include the correct size needle for the mesh count of the canvas.
The Instructions (Your Guide):
This should be more than a simple diagram. Look for kits that offer clear, step-by-step instructions, often with accompanying pictures or links to online video tutorials, guiding you through how to start and end your thread, and how to execute the core stitches.
The Project Size (Your Confidence):
Start small. A perfect beginner project is something that can be completed in a reasonable timeframe, like a key fob, a small ornament, a coaster, or an eyeglass case. This guarantees a quick, satisfying finish, which is the ultimate confidence booster to keep you stitching.
The Essential Stitches: The Tent Stitch Family
Needlepoint is known for its incredible variety of decorative stitches, but as a beginner, you only need to master one foundational family of stitches: the Tent Stitch. All three variations of the Tent Stitch look identical on the front of the canvas—small, diagonal marks—but they differ in how they lay on the back and the coverage they provide.Needlepoint Kits For Beginners
A good beginner kit will typically focus on one or two of these:
1. The Continental Stitch (The Versatile One)
- How it Works: This stitch is worked horizontally or vertically across the canvas. The thread on the back of the canvas runs diagonally and covers two canvas threads.
- Best For: Outlines, small details, letters, and delicate areas of the design.
- The Pro Tip: It’s super versatile and durable, but if used for large areas, it can sometimes pull or warp the canvas if the tension is uneven.
2. The Basketweave Stitch (The Background Hero)
- How it Works: This stitch is worked in neat diagonal rows, alternating direction to resemble a woven basket on the back.
- Best For: Large background areas and designs that require a solid, stable foundation (like a pillow or cushion).
- The Pro Tip: It’s known for preventing the canvas from warping, which is a common issue with the Continental stitch over large areas. Many stitchers find its diagonal, repetitive motion to be the most meditative and “mindless” stitch, perfect for stitching while watching TV or listening to an audiobook.
3. The Half Cross Stitch (The Quick One)
- How it Works: It uses the least amount of thread and is the quickest to execute. The thread on the back only covers one thread intersection.
- Best For: Sometimes used on cheaper or smaller kits, but generally less favored than the other two because it provides less coverage and is less durable for items that will see heavy use (like cushions).
Most beginner kits will instruct you to use the Continental stitch for outlines and detail, and the Basketweave for larger color-block backgrounds. Mastering these two will allow you to complete almost any beginner-level design.Needlepoint Kits For Beginners
Choosing Your First Kit: From Therapy to Treasure
The modern needlepoint market is booming with contemporary, fresh designs that appeal to every aesthetic. Choosing a kit you genuinely love is the most important step, as it will keep you motivated to complete the project.
When shopping, filter your choices by these three criteria:
1. The Theme That Sparks Joy
Move beyond traditional florals if they don’t excite you. Today’s kits feature:
- Witty Sayings & Quotes: Humorous or inspirational phrases are incredibly popular for ornaments and wall hangings.
- Modern Geometric & Abstract Designs: Clean lines, bold color blocks, and minimalist patterns are excellent for beginners because they rely heavily on large areas of a single color, making stitching simple and repetitive.
- Functional Items: Eyeglass cases, key fobs, and small box tops are fast-finishing projects that give you an immediate, useful product.
- Pop Culture: Kits featuring icons, food, travel destinations, or even pet portraits are widely available.
2. The Quality of the Materials
While all kits are beginner-friendly, quality matters for enjoyment. Look for:
- High-Quality Wool: Kits featuring British or other premium wools are generally softer and easier to work with than lower-grade synthetic yarns. They also provide better coverage.
- Clearly Printed Canvas: The design lines should be sharp, not blurry, and the colors on the canvas should closely match the thread colors provided.
- Structured Instructions: If the kit mentions a detailed guide, step-by-step photos, or video links, it indicates a company committed to the beginner experience.
3. Consider the Cost and Commitment
Kits range significantly in price, primarily based on the size of the canvas and the type of thread included (wool being generally more affordable than silk).Needlepoint Kits For Beginners
- Small Kits (Key Fobs, Ornaments): Typically $30–$70. Perfect for an initial test run—a low-cost, low-commitment way to see if you enjoy the process. These can often be completed in a weekend.
- Medium Kits (Small Pillows, Wall Art): Typically $80–$150+. A commitment to a longer project that will result in a substantial piece of decor.
The Beginner’s Toolkit and Pro-Tips
- Don’t Over-Pull: Keep your stitch tension even. Pulling the thread too tight will distort the canvas, a problem called “warping.” Keep it firm, but relaxed.
- Start with the Background: Many stitchers prefer to begin in a large, uniform area, such as the background, to quickly master the Basketweave stitch before moving into the more complex, smaller color sections.
- Start and End Cleanly: Don’t tie a bulky knot at the beginning or end of your thread. Learn the “waste knot” method, where you stitch over the tail on the back of the canvas to secure it neatly.
- Embrace the Meditation: Needlepoint is a slow craft. It’s meant to be a repetitive, relaxing, and mindful activity. Don’t rush the process—enjoy the journey of the stitch.
A beginner needlepoint kit is the perfect portal to a creative hobby that delivers both a calming process and a beautiful, tangible, and durable finished product. Pick a design that makes you smile, unbox the magic, and join the generations of makers who have found peace, focus, and joy, one colorful stitch at a time. Happy stitching!