
The fuel that powers your home or business appliances isn’t always a simple choice. Therefore, the need to convert a natural gas (NG) appliance to run on liquid propane (LP) gas—often called propane—is common. This is true whether you’re moving house, setting up a remote cabin, or simply want flexible energy sources. This is exactly where the crucial, yet often misunderstood, Natural Gas to LP Conversion Kit comes into play.
It’s more than just a set of adapters; in fact, it’s a precisely engineered package. This kit manages a fundamental shift in physics and chemistry. Running an appliance on the wrong fuel without this conversion is extremely dangerous, not just inefficient. This comprehensive guide will break down exactly what a conversion kit is and why you need it. Furthermore, we will detail its components and explain why a qualified professional should handle this job.
The Fundamental Difference: Why Conversion is Mandatory
To truly appreciate the conversion kit’s value, first understand the vast differences between Natural Gas and Propane. They are two entirely different fuels with distinct properties:
| Characteristic | Natural Gas (NG) | Propane (LP) |
| Energy Density (BTU/cubic foot) | Approximately 1,030 | Approximately 2,516 |
| Typical Delivery Pressure | Low (around 3 to 7 inches Water Column – W.C.) | High (around 10 to 11 inches W.C.) |
| Molecular Weight | Lighter than air (disperses quickly) | Heavier than air (pools in low areas) |
| Orifice Size Required | Larger | Significantly Smaller |
The Danger of Direct Hookup: If you connect a propane tank to a natural gas appliance, high-pressure propane will force through the large orifice. This orifice was designed for weaker, lower-pressure natural gas. As a result, you get massively oversized, yellow, sooty, and unstable flames. This creates a severe fire hazard and produces a major amount of poisonous carbon monoxide. Therefore, you must perform the conversion for safe and efficient operation.

What is a Natural Gas to LP Conversion Kit?
A Natural Gas to LP Conversion Kit contains a manufacturer-approved collection of precision parts and instructions. It allows a specific natural gas appliance to safely and efficiently combust propane gas. This could be a stove, furnace, or water heater.
Crucially, these kits are not one-size-fits-all. Every kit is specific to the make, model, and often the BTU rating of the appliance. Using a generic or incorrect kit is a major safety gamble. This is because the components’ precision is non-negotiable for correct fuel metering.
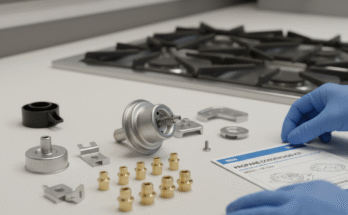
Essential Components of the Kit
The contents of a conversion kit vary depending on the appliance. However, for a common conversion like a gas range, you will typically find three core components:
1. The Propane Orifices (Burner Jets)
The orifices are the most critical component. They are tiny brass fittings with a precisely drilled hole. This hole controls the volume of gas flowing into the burner tube.
- The Conversion: The kit replaces the large natural gas orifices with new, significantly smaller propane orifices. This smaller opening must restrict the flow of high-pressure propane. In short, it correctly meters the fuel to achieve the proper, safe blue flame and the same BTU output.
- Identification: In an appliance like a gas range, each burner often has a different BTU rating. Consequently, the kit will contain an array of color-coded or size-stamped orifices. The conversion chart dictates which specific orifice goes into which specific burner location.
2. Regulator Conversion or Replacement Parts
The gas pressure regulator reduces the high pressure of the incoming gas supply. It reduces it down to the low, precise manifold pressure the appliance’s burners require.
- The Conversion: Natural gas appliances have a regulator set for the low pressure of NG. The conversion kit will include parts to adjust or replace this regulator. This allows the appliance to handle and maintain the higher working pressure of propane.
- Common Method: Often, the regulator for residential appliances is convertible. The kit may include a new regulator spring or a reversible cap. This cap simply needs to be flipped or repositioned from the “NAT” setting to the “LP” setting.
3. New Rating Plate and Documentation
Safety and compliance are paramount. Thus, the kit always includes necessary documentation and labeling:
- Conversion Decal/Plate: You must affix a permanent sticker or plate to the appliance. It clearly states that a technician has “Field Converted [it] to Propane Gas.” This alerts future owners, service technicians, and inspectors to the fuel type.
- Instructions: We provide detailed, model-specific instructions. Furthermore, they outline the step-by-step physical replacement and the required final adjustments.
- Gas Valve Spring (Furnace Kits): For example, in appliances like furnaces, the kit may include an alternative spring for the gas valve. This spring facilitates the higher pressure requirements of propane.

The Conversion Process: A Professional Job
While swapping parts might sound simple, the conversion process is technical. It requires specialized tools, testing equipment, and expertise. Therefore, we highly recommend, and often legally mandate, that a qualified, licensed gas technician or plumber performs this work.
The general steps involve:
- Safety First: Shutting off the main gas supply and disconnecting electrical power to the appliance.
- Access and Disassembly: Removing grates, burner caps, access panels, and sometimes the oven bottom. This exposes the existing natural gas orifices and the pressure regulator.
- Orifice Replacement: Carefully removing the original NG orifices and replacing them with the new, smaller LP orifices. Precision is key, because cross-threading the soft brass fittings can cause a dangerous gas leak.
- Regulator Adjustment: Converting the pressure regulator from the “NAT” setting to the “LP” setting. This often involves unscrewing a cap, reversing a small plunger, and screwing the cap back on.
- Reassembly and Leak Testing: Putting the appliance back together, then re-establishing the gas supply. Crucially, the technician must perform a leak test at every connection point they disturbed. If any bubbles appear, they indicate a leak the technician must immediately correct.
- Final Adjustment and Verification: This is the step that separates the DIY attempt from the professional job.
- Manifold Pressure Test: A technician will use a specialized tool called a manometer to verify the gas manifold pressure is exactly at the manufacturer’s specified setting for propane.
- Air Shutter Adjustment: The technician will observe the flame pattern. A correct propane flame should be steady, crisp blue, and not noisy or lifting off the burner. They will adjust the air shutters to achieve the perfect air-to-fuel ratio for clean combustion.
- Combustion Analysis: Finally, for high-efficiency heating appliances, a calibrated combustion analyzer ensures safe, complete combustion and maximum efficiency.
The Peace of Mind of a Professional Conversion
Purchasing the kit itself is an accessible step. However, the responsibility for the safe and code-compliant conversion rests with the person performing the work. A qualified professional not only possesses the necessary tools but also carries the liability for the converted appliance’s safety and performance.

By investing in the correct, model-specific Natural Gas to LP Conversion Kit and ensuring a licensed technician installs and verifies it, you ensure long-term safety, efficiency, and reliability. This allows you to seamlessly transition to the power and convenience of propane gas. Ultimately, the conversion kit is the small, essential bridge between two powerful energy sources, making versatility and safe operation possible.